


Contents
How to Share a Post on Facebook
If you have made a post on Facebook, you might be wondering how to share it. Luckily, there are many ways to do so. You can select a specific group or all of your friends, and you can also customize the settings. Here are a few tips for making your posts shareable. Once you have done that, you can create a Facebook share button and begin sharing your posts. To make your posts shareable, you must change the default audience of your post.
Change your post’s default audience
If you haven’t already done so, you might want to change your default audience on Facebook. The default audience on Facebook is Friends, and if you’re new to Facebook, you’ll be prompted to change it before you post. You can change your default audience at any time by clicking the settings menu at the top of the page. This may interest you : How to Create a Page on Facebook. Just make sure to review your settings periodically, though. Once you’ve changed the default audience on Facebook, it will apply to any future posts.
Alternatively, you can change your post’s default audience on Facebook by going to your profile and selecting the Edit Settings icon. From here, you’ll see several options for audience, including Friends, Specific Friends, and Lists. Select the option you want, and Facebook will automatically change the default audience to that selection. By enabling the option, your posts will be visible to anyone who can see your profile. It will also be visible to friends, family, and other people on your friends’ feeds.
Schedule your Facebook posts
If you want to post updates frequently but are unable to do it immediately, you can schedule them with the Facebook scheduler. This feature is available for both pages and groups, and can be used to create a series of posts, and even to schedule specific updates. Facebook offers different options for scheduling posts than it does for regular updates, and you can find these options under the Calendar tab. On the same subject : How to Create a Facebook Page for Business. To schedule a post, you must select the date and time that you want it to be published, and then click the “schedule” button. This will allow you to schedule it for 6 months in advance, with limited changes to the content.
Scheduling your Facebook posts is also helpful for other reasons. First of all, you can ensure consistency and quality by planning ahead. You can schedule posts at various times throughout the day, such as outside of your working hours. Another benefit of scheduling posts is that you don’t have to worry about finding the right time to publish them. You can simply add them to your Queue, and they’ll appear in the next available time slot. If you post your wedding photos, they’ll probably remain on top of the News Feed, so you’re likely to get lots of interactions.

Make a post shareable
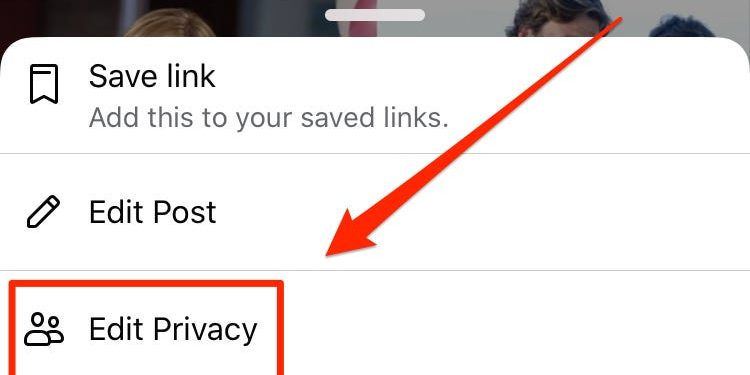
To make a post shareable on Facebook, first make sure it is private. To do this, go to the settings menu on the left side of your post. Tap the three dots at the top of the screen, then select “Public” or any other option. On the same subject : The Lowdown On Facebook Watch & Facebook Marketplace. Your selected posts should now have a “share” button next to them. Once you have selected the audience you want to share your post with, click “Save.”
The privacy menu will let you choose who can see your post, and who cannot. Among the choices are Friends Only, Public, Specific Friends, and Only Me. Selecting “public” makes your post visible to everyone. But if you want to attract a wide audience, choose a custom setting. This will allow you to designate the audience of your post – either only friends, all friends, or just specific people.

Create a Facebook share button
If you want your website or blog visitors to share content on Facebook, you can create a share button to do it easily. This button can be placed on any page on your website and is optimized to show up for Facebook users. If you want your Facebook share button to show up for anyone who visits your site, check out the steps below. We’ve included some useful tips to get you started.
First, decide what kind of posts are shared on Facebook. Some posts are public while others are private. In these cases, a share button will appear at the bottom of your post. If the “Share” button is not there, the post is not public and should be left to the discretion of the author. The most common reasons for sharing a post on Facebook include:


