


Contents
How to Get RTMP URL From Facebook

So you want to know how to get an RTMP URL from Facebook? Well, if you’re a Facebook Live producer, there are several ways to get it. The first way is by using Facebook Live Producer to start a stream. To do this, make sure to enable the automatic start button and persistent stream key. Then, log into Switchboard and navigate to your Destination Group.
MimoLive
If you’re new to streaming with mimoLive, you may be wondering how to get a Facebook RTMP url for your broadcasts. The first step to stream to Facebook is to sign in to your mimoLive account. This may interest you : How to Hide Posts on Facebook Timeline. Then, under Live Streaming Output Destinations, select Facebook. If you’re streaming to a group, you’ll need to login to the group to enable the option to go live.
MimoLive has fixed a number of issues, including the transparency issue in the web browser source. It also added a YouTube account to its Social Media source. In addition, the app has added a new feature called “sport graphics” to make it easier to add your own custom graphics to your videos. It also improved its ability to grab reactions and comments from custom post IDs on Facebook Live. The RTMP url generated by mimoLive now respects user preferences on macOS.

Airmix
You can get your Airmix RTMP url from Facebook by creating an Airmix live event. First, you must create a new event. In the Stream Settings section, you must select the RTMP destination. See the article : How to Find Memories on Facebook. You can also paste your Stream Key into the URL field. Now, you can start streaming on Facebook. You can also use AirPlay to mirror your live feed to compatible devices.
Open the Airmix Solo app on your iOS device. Click the blue gear on the top-left corner. Tap “Settings.” On the Settings page, copy and paste your Switchboard Cloud streaming information. Don’t forget to delete the default URL. You should now be ready to go. You can now broadcast your Airmix live event from anywhere! This is easy, too! Follow the steps below to get started.

Switchboard
One of the first steps to getting your Switchboard url is to login to your Facebook account. Then, click the blue “Authorize” button to enable Switchboard live on your Facebook account. After this, you will be prompted to authenticate using Facebook. See the article : How to See Who is Following You on Facebook. Click “Authorize” and follow the prompts to verify your Facebook account. When you’re finished, click “GO LIVE” to start streaming.
After you’ve signed in, click the “Setup” button on the switchboard page, and follow the instructions to integrate it with Facebook. After that, you can integrate Switchboard into your Facebook app or integrate it with your bot partners. It’s important to note that the Switchboard Cloud is still in beta and has a few limitations. It doesn’t yet support analytics, and it lacks centralized control options. It’s designed for agencies, companies, and organisations with multiple distribution points.
Once you’ve configured the integration, you can pass control to the switchboard agent. Then, you can use the passControl action to integrate the “Speak to agent” flow in your app. The “Speak to agent” action lets you pass control to the agent and begin the conversation. Then, when the customer replies, the bot passes the conversation to the switchboard agent. Once they have finished speaking with the agent, the end user can engage in the flow without the assistance of a human.
Pexip
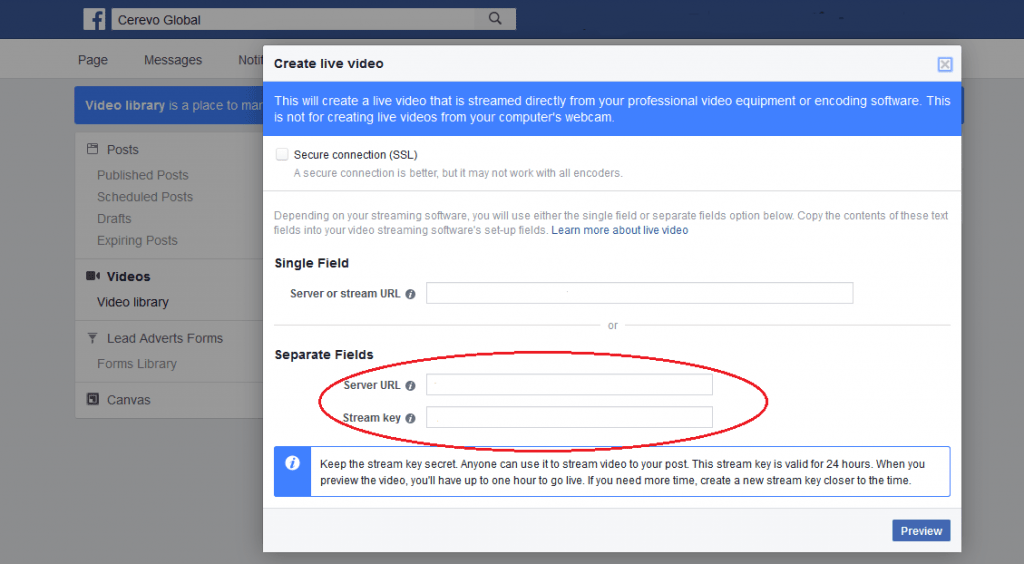
Facebook has many features that make it a great place for live streaming your video content. With the help of Switcher Studio, you can broadcast your videos to Facebook or other social networks. You can also use the Facebook Stream URL to broadcast your video to your followers. Here are the steps to do so. Step 1: Log in to your Facebook account. Step 2: Click on the Settings tab on the left side of the page. Choose the RTMP protocol.


