


Contents
How to Close a Facebook Group

If you’re wondering how to close a Facebook group, then you’ve come to the right place. There are many different options, from rebranding to archiving and removing unwanted members to getting support for deletion. In this article, we’ll walk you through the process step by step. We hope you find it helpful! And if you’re still stuck, here’s a handy guide to help you get started.
Rebranding a Facebook group
If you want to make your Facebook group more visible to new members, it is imperative that you rebrand it. Facebook will soon archive groups that are not admins, as this will prevent the spread of misinformation and harmful content. Here are some strategies to rebrand your group and make it more visible. See the article : How to Unblock People on Facebook. You can even try using Facebook groups to build a business. However, rebranding your group before closing it is not recommended, since it will end up looking like you’ve just deleted it.
Rebranding your Facebook group is not a simple process. You need to get the permission of the group owner before doing this. The group admin must approve any request for permission before a group can be closed. Facebook also has its own rules and guidelines for group admins. If you want your group to stay up and running, you must have the approval of the group admin. If you have any doubts, you can ask your admin for permission to close it.

Archiving a Facebook group
If you want to archive a Facebook group, follow these simple steps. First, log in to your Facebook account. In your left-hand corner, click the three-dot menu icon. This will take you to the group management page. See the article : Why Have My Photo Albums Disappeared on Facebook?. From here, you can choose to archive or delete the group. Archived groups are those that are no longer active. To delete a group, all members must choose to unsubscribe from the group.
Once the group has been archived, it will no longer appear on Facebook. It will only be visible to the group’s members. If you decide to reactivate the group, you will need to notify the admins. Clicking the “Unarchive” button will restore your group to normal functionality. You can also unarchive a group to regain its privileges and functionality. However, it is essential to contact the admins of the group first.

Removing unwanted members from a Facebook group
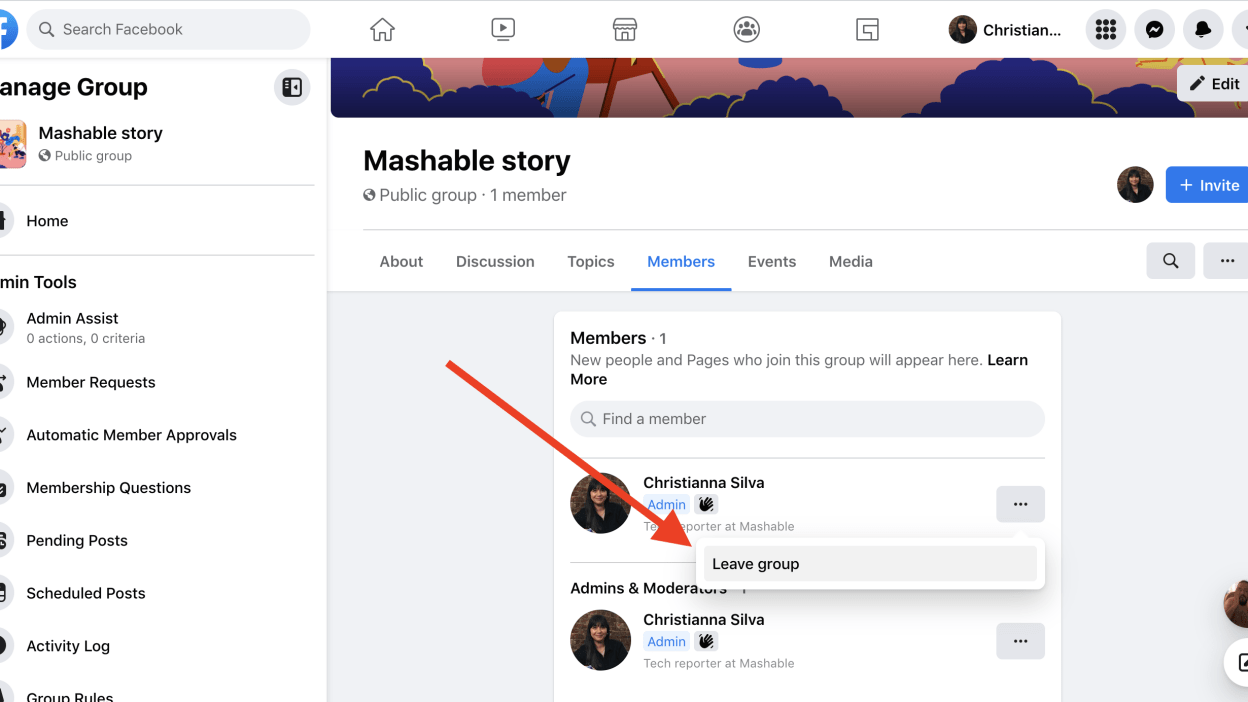
There are a few steps that you can take to remove unwanted members from a Facebook group. First, log in to your Facebook account. Next, choose a group and select its members. Search for the member that you want to remove and click the three dots (…) icon next to their name. Read also : How to See Who is Viewing Your Facebook Profile. Click Remove From Group to delete their posts and comments. You can also block them. This option will not remove them permanently, but it will prevent them from posting again in the group.
Once the member has been removed, they will no longer be able to join the group. The other option is to block them from joining the group in the future. However, this option won’t work if you don’t want the member to see the content of the group. It will also prevent them from being invited back to the group. You can then find and select the member you want to remove by searching for them. Then, click the checkbox next to the member. You should then be able to do this in a few minutes.

Getting support for deleting a Facebook group
If you are wondering how to delete a Facebook group, you are not alone. Many Facebook users have experienced this frustration and have asked for help. This article will help you learn how to remove a group from your Facebook account. Once you have found the way to delete a Facebook group, you will no longer have to deal with the repercussions. Here are a few steps to help you get started.
First, log into your Facebook account and locate the group you want to delete. The group may be listed on the left-hand side of the screen or you can search for it by typing in its name. Once you’ve found the group, click on its name to navigate to its management page. Click the three-dot menu icon to the right of the group title bar. Choose the option you wish to remove.


