


Contents
How to Create a Shop on Facebook

If you’ve been wondering how to create a shop on Facebook, then you’ve come to the right place. Listed below are a few helpful tips and tutorials for setting up your Facebook shop. Keep reading to discover how to use Facebook’s Commerce Manager and upload your products and collection. After you’ve completed these steps, you’ll have a fully functional Facebook store that’s ready to sell. You can also follow our guide to create a custom domain name and host it yourself.
Setting up a shop on Facebook
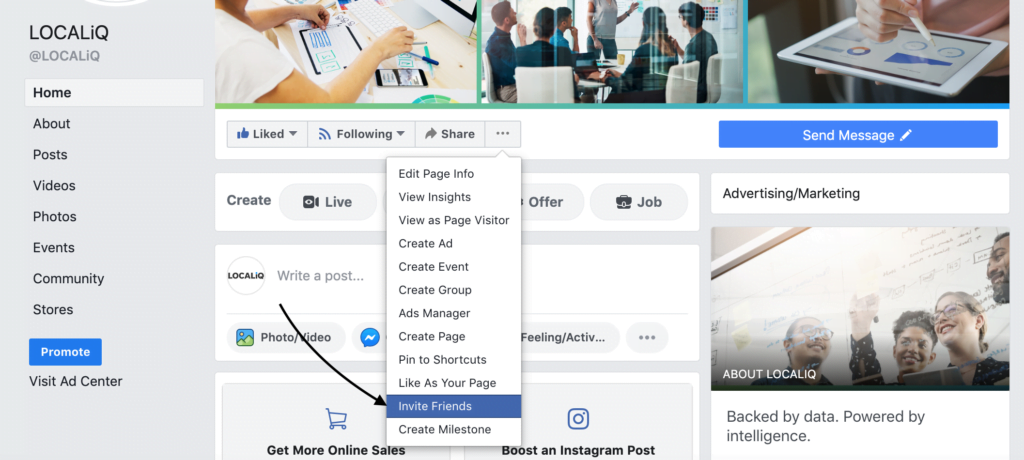
First, you need to have a Facebook Page. Once you have a Page, you can set up your Shop. Once you have a Shop, it will appear on the Shop tab of your Facebook page. To see also : When Does Facebook Become Meta?. From here, you can manage your orders and updates, schedule posts, review them, and track engagement levels. To create your own Facebook Store, click “Add” in the top-right corner of your Facebook page.
After you have created a business page, you must log in as the admin. Then, click “Shop” and select “Set up a shop.” You’ll be prompted to enter your business name and state. Next, select the products you plan to sell and enter your TIN number. You can also indicate how you plan to ship items. You can customize your store’s appearance and settings as well. You can also customize your delivery and return policies, as well as any other information that pertains to your business.

Adding products manually
You can add your products manually to Facebook’s shop by visiting the Shop tab in your page’s settings. Once there, you can add your products and choose delivery methods, as well as specify your business’s category, location, tax information, and bank account. Read also : What Size is a Facebook Cover Photo 2022?. Facebook will display a list of your products and suggest a shipping method for each one. To save time, you can also add a product catalog.
The first step is to add a product description. If you’re selling handcrafted furniture, you can type’solid wood’ in the description field. You’ll also need to include a brand name and product category. Facebook will automatically fill in the rest of the information, including the main product photo. The main product photo should be 600 x 600 pixels. Once you’ve entered the basic information, you’ll need to upload a product photo.

Using the Facebook Pixel
Using the Facebook Pixel to create a store is an excellent way to track how many people are viewing your products online. Once you know how many people have visited your website, you can use the data to build dynamic ads and custom audiences to increase sales. Here are some steps to help you set up your Facebook Pixel. See the article : How Do You Delete Facebook From Your Computer?. After creating the shop, follow the steps below to use it for your business. Once you’ve got it working, your customers will love you forever!
First, you need to enable data sharing on your Shopify account. Then, click on the Settings link. Once you have enabled data sharing, you need to copy the Pixel ID from the Facebook website and paste it into the Shopify store. The Facebook Pixel is similar to the custom audience pixel, which is required for your Shopify store. You can also track your conversions or contact form leads by using the Facebook Pixel.
Writing a description for your shop
There are many benefits of writing a descriptive text for your Facebook store. It can help your product appear higher on Google and increase the number of people who view it. In addition to increasing conversions, a great text will help build trust in your brand and make your site more visible to search engines. Here are some tips for writing a description for your shop on Facebook:
A good description should anticipate what your potential customers are looking for. It should also anticipate problems and anticipate the needs of your customers. For example, if you are selling shoes, you can make sure your product description will be a good match for someone looking for that shoe style. Another important factor to consider when writing a description for your shop on Facebook is the number of likes your product gets. Your customer engagement will improve if they have positive feedback on your product, which is a good sign!
Adding collections of products
When setting up a Facebook Shop, you should choose a cover image that fits the 4:3 ratio of your page. Make sure it is at least 1080 x 810 pixels in size. The collection will appear above your timeline and first in your shop. You can then add more collections and customize your shopfront. Once it has been approved, you can publish your shop. Adding collections is easy!
You can also use the Commerce Manager to manage orders. Facebook has an ad format that targets mobile devices. To make Collections more visible on mobile devices, use Collection Ads. The ads are targeted to your target audience and use a visually appealing template. Facebook also provides insights on Shop usage. Listed below are the steps to follow when adding collections of products to your Shop on Facebook. Once you’ve added a collection of products, you can create a Facebook page for it.
Adding product grids
Adding product grids when creating a shop on Facebook is a great way to make it easier for people to browse your products. These grids can be used to highlight important links, such as your online store homepage, new arrivals, or upcoming events. To add a grid, click the Add Link button and enter your link text and URL. Once you’ve added your links, you can save them and update them as often as you like.
You can also add product grids to your shop with WooPack. Theme code is included in the plugin, and you can use it to customize the layout and styling of the grids. This way, your product grids will be consistent across your Facebook page and look great. You can also add a product carousel if you wish. You can also add the WooPack Custom Themer Code to the product grids to create a customized layout for your Facebook store.


